

It was just the other day while I was carrying my Tangerine Tote and I looked down at my jewelry on my wrists.. I though to myself that there was something missing. I knew I wanted something small with a hint of sparkle. One of my all time favorite lifestlye blogs, Cupcakes and Cashmere, did a DIY post on an Ombre Beaded Necklace (click here). After I saw her how-to, I got inspiration to make a bracelet. The difference between Emily’s necklace and my bracelet, is that mine involves adding a clasp. Don’t let this scare you, DIY-ers. It’s simple. My mother, who is an excellent beader told me, that wrapping and securing a wire around a clasp and beads take time and practice.
Check out my mom’s beads below! She seriously has some major treasure and bling.

Blue Beads

Champagne Beads

Gold Beads
After I shopped around for the perfect beads I started collecting the supplies I needed…

Jewelry Plier Tools:
- Flat Nose
- Soft Metal Cuter
- Round Nose
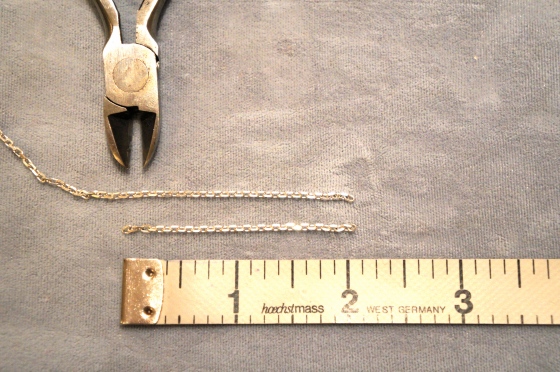
1. Chose a delicate chain. You can purchase your choice of chain online, a local bead store or at Michael’s. I have a 6 1/4 ” wrists. Use a flexible tape to measure your wrist size. If you don’t have one, take your chain, wrap it around your wrist and measure the length of the chain on the ruler. Write your size on a piece of paper. Then decide how long you want your beaded wire to be. These are my measurements:
- Two pieces of chain each at 2″ chains
- Wire Length: 2.25 ” which fits 9 beads
NOTE: Remember, the wire has to be long enough to be able to wrap around the beads. Even though my wire with beads on it is 2.25″ I cut a wire that was around 4″

Beaded Bracelets Material
Materials:
- 2 pieces of chain, cut in the correct size (image above: 2″ chain)
- Beads of your choice (image above: 9)
- 4″ soft wire
- Clasp
- 2 Jumprings

1. Take your clasp, 1 jump ring and 1 piece of chain. Use your Flat Nose Plier and Round Nose Plier to separate the jumpring. NOTE: Do not cinch the jumpring together. When you look at the jumpring, you can see that it already has a tiny opening. At the opening, hold the flat nose on one side and the round nose plier on the other. Carefully, pull slightly in the opposite direction. The jumpring will open. Slide one end of the chain and clasp into the jumpring. Once both pieces are secure, use the two tools to close the jumpring. Please remember not to cinch it.

2. Repeat step one. However, just take the other piece of chain and other jumpring. This makes it so the clasp can attach/fit in the second jumpring. Then set aside.

4. Take your wire. Use your Round Nose Tool and wrap one end of the wire around the around one of the noses on the plier. Remember to leave about 1/2 ” of wire, because you will have to wrap the wire to secure the beads.

5. String your beads on the wire.
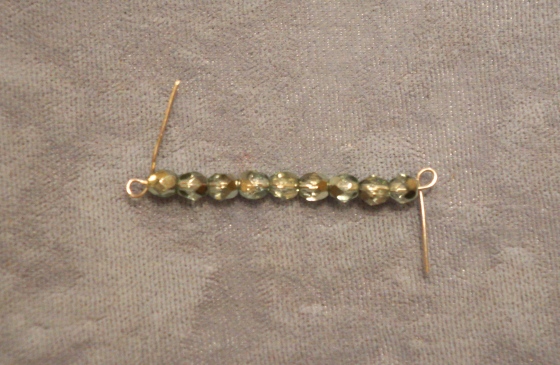
6. Repeat step four on the opposite end of the wire.
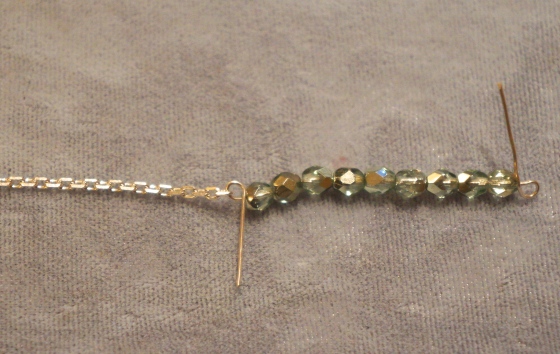
7. Attach one end of the chain that is NOT connected to the jumpring. Once you have slide it through, use your Flat Nose Plier and hold the chain and wire in place. Use your finger to “wrap” the wire around the wire towards the beads. Wrap wire at least 2 times and make sure the beads are firm and secure in place. Do this to both sides of the wire. Use your soft wire cutters to cute off the excess of the wire.

Ta—DA! You did it! The first time you try and make one of the beaded chain bracelets let me know how it goes. Try and make a few more and wear them together! Let me know if I can help you in anyway. Good luck DIY-ers! xo
